Cut Chicken Wings Yourself: Save Money & Master the Skill
Chicken wings. Few dishes evoke such universal delight, whether they're crispy, saucy, spicy, or sweet. They're a staple for game day, parties, or simply a satisfying meal. While incredibly popular, the cost of pre-cut chicken wings at the grocery store can quickly add up. Did you know you could be paying significantly more for the convenience of someone else doing a task that's surprisingly simple to master yourself?
Learning how to cut chicken wings is not only a fantastic way to stretch your food budget but also an incredibly satisfying culinary skill to acquire. With just a sharp knife and a few minutes of your time, you can transform whole chicken wings into the familiar drumettes and wingettes, ready for your favorite recipes. Forget those extra cents per pound – become your own wing butcher and revel in the savings and the satisfaction of a job well done.
Why Cut Your Own Chicken Wings? The Financial & Culinary Advantage
The primary driver for many home cooks to start cutting their own chicken wings is, undoubtedly, the cost savings. Grocery stores typically sell whole chicken wings at a lower price point than their pre-portioned counterparts. This difference can range anywhere from 30 to 70 cents per pound, which, over time, adds up to a substantial amount. Think about it: if you buy 10 pounds of wings a month, you could be saving $3 to $7 just by performing two quick cuts per wing. This might seem small initially, but consistent savings make a difference in your household budget. For a deeper dive into the economics, check out our article on Whole vs. Pre-Cut Wings: Slash Costs by Cutting Your Own.
Beyond the financial benefits, there are several other compelling reasons to embrace this skill:
- Easier Eating & Cooking: While you can cook whole wings, cutting them into drumettes and wingettes makes them far more manageable to eat. It also allows for more even cooking, as each piece is roughly the same size and shape, ensuring consistent crispiness or tenderness.
- Customization: Cutting your own wings gives you complete control. You decide which parts you want to use and how you want them prepared.
- Zero Waste Philosophy: An often-overlooked benefit is the ability to save the wing tips. These small, bony pieces might not be meaty enough for a snack, but they are absolutely bursting with collagen and flavor, making them ideal for homemade chicken stock. Instead of tossing them, you can freeze them until you have enough to brew a rich, gelatinous base for soups, sauces, or gravies. This is a true testament to maximizing every part of your ingredients.
- Mastery & Confidence: There's an undeniable sense of accomplishment that comes with mastering basic butchery skills. It's empowering to know you can take a whole ingredient and prepare it precisely to your needs, rather than relying solely on pre-processed options.
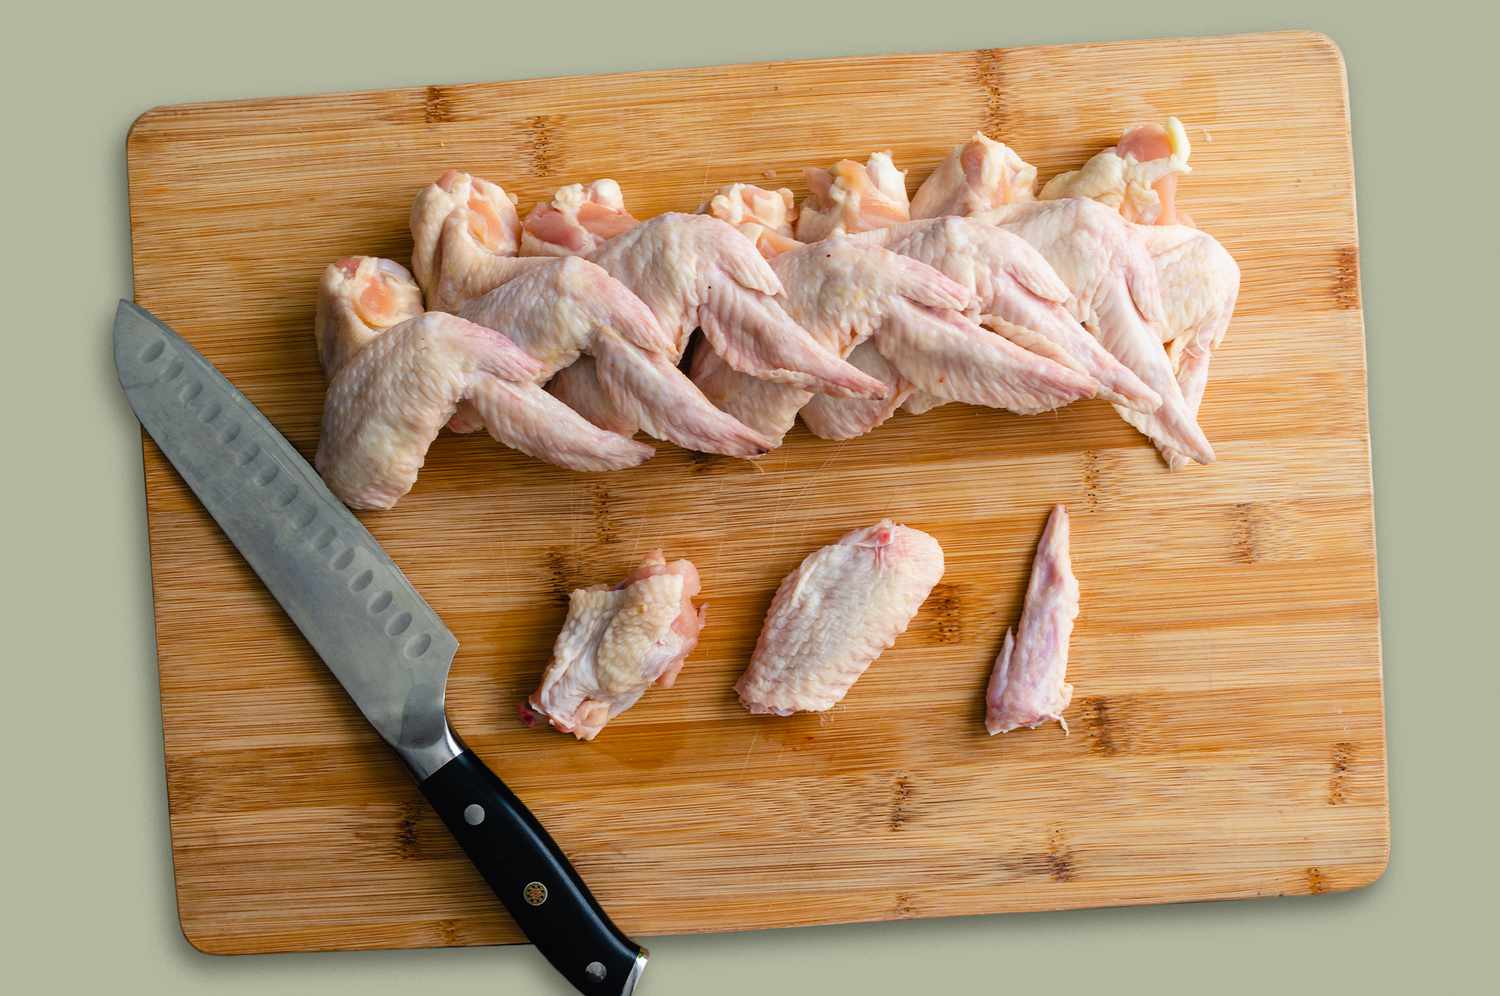
Understanding the Anatomy of a Chicken Wing
Before you make your first cut, it helps to understand the distinct parts of a whole chicken wing. When you stretch out a raw wing, you'll observe three main sections:
- The Drumette: This is the meatiest part of the wing, resembling a miniature drumstick (hence the name). It's connected to the main body of the chicken and has the most flesh.
- The Wingette (or Flat): Often referred to as the "flat" due to its flatter shape, this is the middle section of the wing. It has two small bones running parallel to each other and is known for its skin-to-meat ratio, which crisps up beautifully.
- The Wing Tip (or Flapper): This is the smallest, boniest, and least meaty part at the very end of the wing. While not typically served as a primary piece, as mentioned, it's invaluable for making flavorful chicken stock.
Your goal is to make two strategic cuts at the joints to separate these three sections. It's all about finding the natural seam where the bones connect, not brute force.
Step-by-Step Guide: Mastering the Art of Cutting Chicken Wings
You'll be amazed at how quickly you can process a large batch of wings. Many experienced home cooks can cut two pounds of chicken wings in about two minutes! For even faster techniques, explore our guide How to Easily Cut Chicken Wings in Under 2 Minutes.
Preparation is Key:
- A Good Sharp Knife: This is non-negotiable. A sharp chef's knife or a sturdy boning knife will make the process incredibly easy and safe. A dull knife is more likely to slip and cause injury.
- Cutting Board: A stable, non-slip cutting board is essential.
- Two Bowls: Have one bowl ready for your separated drumettes and wingettes, and another for collecting the wing tips for stock.
The Cutting Process (Two Common Approaches):
While there are slight variations in technique, the underlying principle is the same: locate the joint. Both methods below achieve the same result effectively.
Method 1: The "Flip and Cut" Approach
- Position the Wing: Place a whole chicken wing on your cutting board. For easier visibility of the joints, you can stretch out the wing and then flip it over so the inside portion (the concave side) faces upwards. This often exposes the "high ridge" of the joints more clearly.
- First Cut: Separating the Wing Tip: Identify the joint between the wing tip and the wingette. It will feel like a ridge or a natural indentation. Place your sharp knife precisely on this joint. With a firm but gentle push, cut straight through. You should feel very little resistance if you've hit the joint correctly. If you encounter significant resistance, reposition your knife slightly.
- Set Aside the Tip: Place the separated wing tip into your designated "stock" bowl or a freezer-safe bag.
- Second Cut: Separating the Drumette and Wingette: Now, focus on the remaining two-part section. Find the joint connecting the drumette and the wingette. Again, you're looking for that natural ridge. Place your knife at this joint. Push down with your knife. If you feel resistance, gently wiggle the knife a tiny bit to find the sweet spot, then push through. It should be a clean, effortless cut.
- Ready to Cook: You now have a perfectly separated drumette and wingette, ready for seasoning and cooking!
Method 2: The "V-Stretch" Approach
- Hold the Wing in a "V": Pick up the whole wing, specifically holding the drumette end. Manipulate the wing so that the joint between the drumette and wingette forms a distinct "V" shape. This action naturally stretches the joint open, making it easier to see and cut through.
- First Cut: Separating the Drumette: With the joint exposed in the "V," place your knife vertically into the center of the "V." The knife should glide through with minimal force. You're cutting directly through the cartilage of the joint.
- Now for the Wing Tip: Take the remaining two-part section (wingette and wing tip). Again, hold it to form a "V" shape at the joint connecting the wingette and the wing tip.
- Second Cut: Separating the Wing Tip: Place your knife at the base of this new "V" and cut straight down.
- Done! You'll be left with your drumette, wingette, and the wing tip for stock.
Essential Tips for Success:
- Let the Knife Do the Work: A truly sharp knife requires less force, which reduces the risk of slippage. If you're struggling, your knife might need sharpening.
- Feel for the Joint: Don't try to hack through bone. The joints are made of cartilage, which is much softer. A gentle probing with the knife will usually reveal the path of least resistance.
- Practice Makes Perfect (and Faster): The first few wings might take a moment, but you'll quickly develop a feel for the joints and increase your speed. Before you know it, you'll be cutting wings like a seasoned pro!
- Don't Waste the Tips: Seriously, bag those wing tips! They are a golden ticket to incredibly flavorful homemade chicken stock, enhancing countless future dishes. Just pop them in a freezer bag and add to it until you have a good collection.
- Cleanliness is Crucial: Always wash your hands, knife, and cutting board thoroughly with hot, soapy water after handling raw chicken to prevent cross-contamination.
Beyond the Cut: What to Do with Your Freshly Prepared Wings
Once you've expertly cut your chicken wings, the culinary possibilities are endless! They are now perfectly portioned for any cooking method:
- Baking: Toss them with your favorite rub or sauce and bake until crispy.
- Frying: Achieve that classic restaurant-style crispiness with a deep fryer or air fryer.
- Grilling: Marinate and grill for a smoky flavor.
- Slow Cooking: Ideal for falling-off-the-bone tender wings that can be finished under a broiler for crispiness.
Experiment with different marinades, dry rubs, and sauces to create your signature wing recipe. From classic buffalo to sticky honey garlic or spicy Korean gochujang, your freshly cut wings are a blank canvas for flavor.
Conclusion
Learning how to cut chicken wings is a simple yet rewarding skill that offers significant financial savings and culinary flexibility. It transforms you from a consumer of pre-portioned goods into a confident home butcher, ready to tackle your next delicious wing creation. So, the next time you're at the grocery store, grab that package of whole chicken wings. With a sharp knife and these straightforward techniques, you'll be whipping up perfectly portioned drumettes and wingettes in no time, all while saving money and impressing your taste buds.
